
Ever wondered what you’d do if your car wouldn’t start on a chilly morning? Or maybe you’re just the proactive type who likes to stay ahead of automotive issues. Either way, knowing how to remove a car battery is a game-changer. It’s not just about swapping out a dead car battery—it’s about saving cash, building skills, and being ready for whatever your vehicle throws at you.
Why You Might Need to Remove a Car Battery
So, why would you even need to mess with your vehicle battery? Here are the top reasons:
- Replacing a worn-out or dead battery: Did you know the average car battery lasts about 3-5 years, according to AAA? If your ride’s sluggish or the battery’s pushing that age limit, it’s probably time for a battery replacement.
- Performing vehicle maintenance or electrical repairs: Sometimes, you need to dig into the engine bay for diagnostic checks or to fix electrical components, and that battery’s just in the way.
- Storing the battery during extended periods of inactivity: Heading into winter or leaving your car parked for months? Removing the battery prevents it from turning into a drained battery—or worse, freezing solid.
Benefits of Learning This Skill
Why bother learning this yourself? Well, here’s why I think it’s worth it:
- Save money by avoiding professional service fees: A shop might charge you $50-$100 just for labor, per estimates from RepairPal. Do it yourself, and that’s cash back in your pocket.
- Gain independence and confidence in car maintenance: There’s something satisfying about handling your own electrical issues—no mechanic required.
- Be prepared for roadside emergencies: Picture this: you’re stranded with a faulty battery, but you’ve got this covered in 10-15 minutes. Pretty cool, right?
What to Expect
Don’t sweat it—this isn’t rocket science. Removing a car battery takes about a couple of minutes if you’re quick, or 10-15 minutes if you’re taking it slow. You’ll need some basic tools like an adjustable wrench and a bit of safety know-how. The process? It’s simple: prep your space, disconnect the battery terminals, lift it out, and clean up. I’ll break it all down step-by-step so you’re not guessing.
Why Safety Matters
Here’s the deal: car batteries aren’t toys. They’re packed with liquid battery acid and can zap you with a 12-volt jolt if you’re careless. Mishandle one, and you’re risking acid burns, electrical shock, or even damage to your car’s electrical power system. The Battery Council International says over 2,000 people get injured yearly from battery-related mishaps. Let’s keep you off that list with some smart safety moves. Want to know more, visit our website…
Safety Precautions: Keeping It Safe and Sound
Before you grab that socket wrench, let’s talk safety. Handling a lead-acid battery isn’t dangerous if you’re smart about it, but skip these steps, and you’re asking for trouble.
Understanding the Risks
What’s the big deal? Here’s what you’re up against:
- Exposure to battery acid: That stuff can burn skin and ruin clothes faster than you can say “oops.”
- Potential short circuits: Cross the positive terminal and negative terminal with a metal tool, and you’ll get sparks—or worse, a fried electrical ground.
- Heavy lifting hazards: These batteries weigh 30-60 pounds, says Interstate Batteries. Drop it, and you’re looking at leaks or a sore foot.
Essential Safety Gear
Gear up like you mean it:
- Insulated gloves: Keeps your hands safe from acid and electric shocks.
- Safety glasses: Shields your eyes from sparks or debris flying off corroded battery terminals.
- Long sleeves and pants: Covers your skin so you’re not regretting that acid splash later.
Preparing the Vehicle
Set yourself up for success:
- Park on a level surface: No one wants a rolling car mid-project.
- Turn off the engine: Pull the key out to cut the flow of power.
- Engage the parking brake: Extra stability for peace of mind.
Battery Handling Rules
Follow these to stay out of trouble:
- Disconnect the negative terminal first: It’s your earth connection, and removing it first cuts the short-circuit risk.
- Avoid metal tools touching both terminals: A 10-millimeter open-end wrench bridging the positive post and negative post? Bad news.
- No sparks or flames: Batteries release flammable gases, so keep cigarettes and lighters away.
Safe Lifting Techniques
When it’s time to hoist:
- Don’t tip the battery: Tipping spills acid, and that’s a mess you don’t want.
- Use both hands or a battery carrier: Keeps that heavy beast steady and safe.
Tools and Materials Needed: Your DIY Toolkit
You don’t need a fancy garage setup—just a few essentials and some nice-to-haves. Here’s what I’d grab.
Essential Tools
- Adjustable wrench or socket set: Most battery terminals use 8mm, 10mm, or 13mm sizes—check yours ahead of time.
- Pliers: Perfect for wiggling off a stubborn battery cable.
Recommended Extras
- Battery terminal cleaner or wire brush: Corrosion on battery terminals? This’ll scrub it right off.
- Battery carrier or strap: Makes lifting that 40-pound battery a breeze.
- Multimeter: Optional, but great for checking if your 12-volt battery’s still got juice—aim for above 12.4 volts.
Safety Gear
- Insulated gloves and safety glasses: Already covered, but worth repeating—they’re your best friends here.
Cleanup Supplies
- Baking soda and water mixture: Mix a tablespoon with a cup of water to neutralize acid spills.
- Clean rags or paper towels: For wiping down the battery tray.
- Small container or brush: Makes applying that baking soda solution easy-peasy.
Step-by-Step Guide to Removing a Car Battery

So, you’ve already located the battery, prepped your work area, and disconnected the negative terminal—nice work! Now, let’s pick up at step 4 and walk through the next steps together. This is where the action heats up.
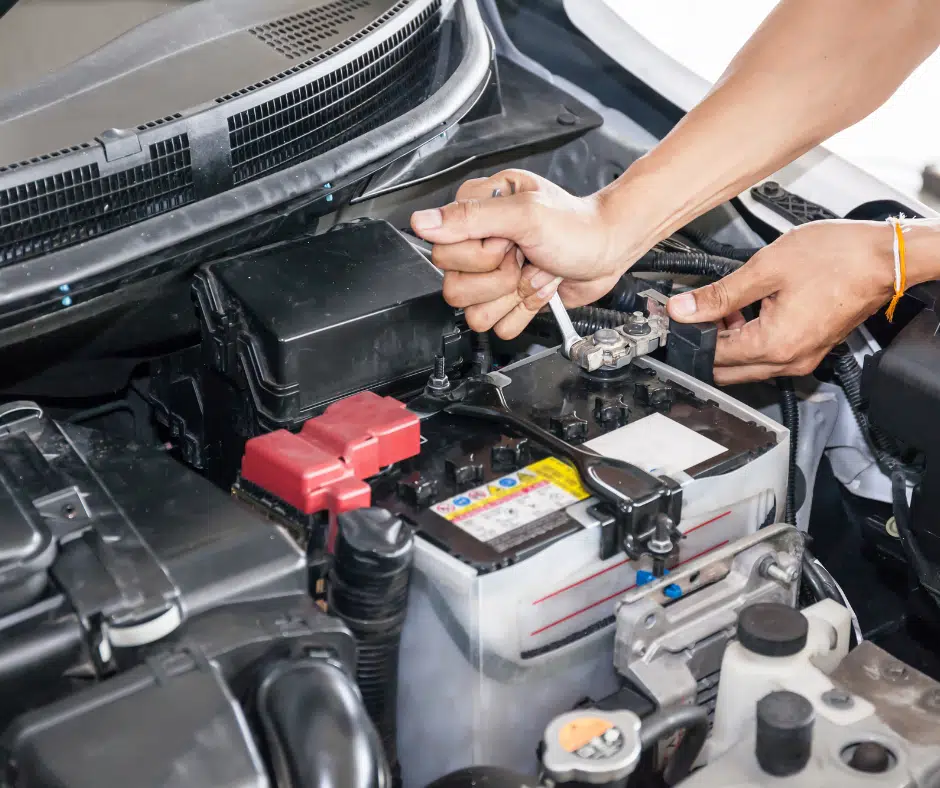
Disconnect the Positive Terminal
Time to tackle the positive terminal. Look for the red cable or the one marked with a “+”—it’s the positive post, and it’s a big deal. Grab your wrench (a 10-millimeter open-end wrench usually does the trick) and loosen the nut by turning it counterclockwise. It’s like unscrewing a stubborn ketchup bottle cap—just keep it steady. Once it’s loose, gently wiggle the positive battery cable off and tuck it safely away from the battery. Why does it matter where you put it? If it accidentally touches the battery terminals, you could spark some unwanted electrical issues. I like to rest mine on a mat or cardboard—keeps things tidy and safe.
Here’s a fun fact: according to the Battery Council International, the average vehicle battery lasts 3-5 years. So, if your 12-volt battery is on its last legs, this step is your ticket to a smooth battery replacement.
Remove Hold-Down Clamps or Brackets
Your battery isn’t just chilling there—it’s locked in place with a battery hold-down bracket or some clamps. These keep it from bouncing around in the engine bay while you’re driving. Look for bolts or fasteners securing it; their size depends on your car, so an adjustable wrench or a socket wrench set handy is your best bet. Turn those bolts counterclockwise to free them up, and set the hardware somewhere safe—like a little cup or your pocket. Ever lost a bolt under the hood? Yeah, it’s the worst.
This step’s all about patience. If the bolts feel tight, don’t force them—you might strip them, and then you’re in for a headache. A little tip from me: I always give them a quick spray with penetrating oil if they’re stubborn. Works like a charm.
Lift the Battery Out
Now for the heavy lifting—literally. A typical car battery weighs 30-60 pounds, so brace yourself. If you’ve got a battery carrier, use it; it’s like having an extra set of hands. No carrier? No problem—just grip the battery firmly with both hands. Lift it straight up to avoid sloshing any liquid battery acid around. Place it on a stable, non-metallic surface—think wood or plastic, not metal. Why? Metal can mess with the battery charge if the terminals touch it, causing a short circuit.
Feeling the strain? For electric vehicles with high-voltage batteries, this step might need extra caution—those can pack a punch. Once it’s out, take a breather. You’ve just conquered the hard part!
Troubleshooting Common Issues
Things don’t always go perfectly, right? Let’s troubleshoot some hiccups you might hit while removing that battery. Don’t worry—I’ve got your back.
Dealing with Corroded Terminals
Spot some white, powdery gunk on the battery terminals? That’s battery corrosion, and it’s pretty common. It’s like the battery’s way of saying, “I’ve been working hard!” Grab a wire brush or a terminal cleaner and scrub it off. If it’s safe, rinse with a little water afterward. Wear safety glasses here—battery corrosion can splash, and your eyes deserve protection. This happens because battery gases react with the metal terminal connector over time. A quick clean keeps your electrical connections solid.
Stuck or Rusted Bolts
If those bolts or clamps won’t budge, rust might be the culprit. Spray some WD-40 or penetrating oil on them and wait a couple of minutes—let it work its magic. Then, use your wrench with steady, gentle pressure. Don’t yank too hard; stripping the bolt makes it a nightmare to remove. I’ve been there, and trust me, slow and steady wins this race.
Hard-to-Reach Batteries
Some batteries hide in tight spots—like under an airbox or deep in the engine bay. Tricky, huh? An extension bar with your socket wrench can reach those awkward places. If you’re comfy, remove nearby parts (only if it’s safe!) to get better access. Just make sure you know how to put it all back. It’s like a car puzzle—fun if you’ve got the patience.
Acid Spills
Oops, did some liquid battery acid spill? Act fast. Mix baking soda with water and pour it over the spill—it neutralizes the acid like a superhero swooping in. Clean it up and dispose of any rags responsibly—check your local rules for hazardous battery components. The EPA says over 99% of lead-acid batteries get recycled, so keeping things safe matters.
Additional Tips and Best Practices
Let’s wrap up with some extras to make this a breeze and keep your battery game strong.
Cable Labeling
Before you disconnect anything next time, slap some tape on the positive and negative cables and mark them. It’s like labeling your leftovers—saves you from guessing later. Mix up the negative battery cable with the positive connector, and you’re risking electrical ground issues. I always do this; it’s a lifesaver.
Battery Condition Check
While the battery’s out, give it a once-over. Cracks, leaks, or bulging on the plastic battery casing? That’s a red flag for a faulty battery. Got a multimeter? Test the battery level—below 12.4V means it’s probably toast. Think of it like checking your phone; low battery life calls for a new one. Consumer Reports says improper handling is a top cause of automotive issues, so this check can save you trouble.
Disposal Guidelines
Don’t chuck that old battery in the trash—it’s hazardous waste. Drop it off at auto parts stores, battery retailers like Interstate Batteries, or recycling centers. Places like Interstate All Battery Center make battery recycling easy. Fun stat: the EPA notes that lead-acid batteries have a 99% recycling rate—one of the highest for any product. Pretty cool, right?
When to Call a Professional
If the battery’s leaking like crazy or the terminals look trashed, don’t mess around—call a pro. Same goes if you’re not feeling confident or lack tools like a battery cable removal tool. Sometimes, paying for experience safe beats DIY stress. I’ve called a mechanic once or twice—no shame in it.
Conclusion: You’re Ready to Roll with Your Car Battery

Well, look at you—you’ve just walked through the ins and outs of removing a car battery like it’s no big deal! Before you grab that socket wrench and head to the engine bay, let’s tie it all together with some key points and a little pep talk. You’re about to save some cash and feel like a DIY rockstar—how cool is that?
Key Takeaways
Here’s the quick rundown to keep in your toolbox:
- Safety is your VIP: Always start by disconnecting the negative terminal first—it’s your electrical ground and keeps those pesky sparks at bay. Pop on some safety glasses and gloves to shield yourself from battery corrosion or a splash of liquid battery acid. And trust me, that battery’s heavier than it looks, so lift it like you mean it!
- Simpler than a LEGO set: With a 10-millimeter open-end wrench (or an adjustable wrench in a pinch) and a couple of minutes, you’re golden. Most folks can swap out a vehicle battery in 10-15 minutes—faster than waiting for a tow truck, right?
- You’re the boss: Why shell out $50-$100 for a mechanic when you can handle this yourself? According to RepairPal, that’s the average labor cost for a battery replacement. With a little know-how, you’re keeping that money in your pocket and bragging rights in your toolbox. Want to know more, visit our website…
Empowerment Message
You’ve totally got this! If you can figure out a tricky video game level or survive a flat-pack furniture manual, removing a car battery is a breeze. Take it step-by-step, and you’ll be amazed at how easy it feels. Plus, there’s nothing like the thrill of popping the hood, unhooking that negative cable, and knowing you’ve conquered an automotive issue all on your own. Who needs a pro when you’ve got DIY skills like these?
Next Steps
- Level up your game: Now that you’re a battery removal pro, why not check out guides on installing a new 12-volt battery or keeping it charged with a battery maintainer? Your car will thank you!
- Join the convo: Got a slick trick for loosening stubborn battery tie-downs? Or maybe a funny story about a dead car battery stranding you somewhere? Share it in the comments—I’m all ears!
Frequently Asked Questions (FAQs)
Still got questions buzzing around? No sweat—I’ve got your back with answers to the stuff people ask most when they’re elbow-deep in battery cables and clamps. Let’s clear up the confusion!
Can I remove a car battery without tools?
Not really, my friend. You’ll need at least a wrench to loosen those battery terminals—think of it like trying to eat soup with a fork; it just doesn’t work! A socket wrench set handy is your best bet, but a basic adjustable wrench can step up if you’re in a bind. Bare hands? That’s a no-go unless you want sparks flying from the positive post.
How do I know if my battery needs replacing?
Is your engine cranking slower than a sleepy turtle? Are your headlights dimmer than a low-voltage battery? Time to play detective! Grab a multimeter and check the battery level—anything under 12.4V on a 12-volt battery is a red flag. The folks at Interstate Batteries say most lead-acid batteries last 3-5 years, so if yours is getting up there in age (check the sticker on the battery tray), it might be time for a fresh one. Fun fact: AAA reports that 1 in 3 drivers will face a dead battery this year—don’t let it be you!
What if the terminals won’t budge?
Stuck battery terminals are the worst—like a lid glued shut on your favorite snack jar. Here’s the fix: spray some penetrating oil (WD-40 works wonders) on the corrosion on battery terminals and let it chill for a couple of minutes. Then, gently wiggle the battery cable with pliers. Don’t yank too hard—you don’t want to strip the battery post and turn a quick job into a nightmare. Patience is your pal here!
Is it safe to do this at home?
You bet it is—as long as you follow the proper battery protocols! Gear up with safety glasses and gloves, keep sparks away (those hazardous battery components can release flammable gases), and handle that plastic battery casing with care to avoid spills. Now, if you’re messing with high-voltage batteries in electric vehicles or hybrid power setups, that’s a different story—leave those to the pros. For your standard engine battery tray, though? You’re good to go in your own garage.


