
Why Testing a Car Battery is Important
Picture this: you’re rushing out the door, late for school or work, and your car won’t start. Ugh, not cool, right? That’s where your car battery comes in—it’s like the superhero of your vehicle. This little box under the hood powers up your engine and keeps all the fun stuff like your lights, radio, and even your phone charger going. Without a healthy car battery, you’re stuck with a dead car battery, and trust me, that’s a hassle nobody wants.
So why should you bother testing it? Well, regular battery testing is like giving your car a quick health check-up. It helps you spot battery issues—like a weak battery or a bad battery—before they leave you stranded. Imagine avoiding a flat battery on a freezing morning or saving cash by not needing a tow truck. According to the Interstate All Battery Center, testing your battery regularly can stretch its battery life by up to 20%. That’s huge! Most 12-volt batteries last 3-5 years, but with the right care, you might keep it humming even longer. Plus, catching problems early—like low battery voltage or signs of corrosion on the battery terminals—can save you from pricey repairs. I think every car owner should test their battery—it’s such an easy way to avoid big headaches!
What is a Multimeter?
Okay, so what’s this multimeter thing? Think of it as a magic wand for checking your car’s battery health. A multimeter is a super handy tool that measures stuff like voltage, current, and resistance. For your car battery, it’s all about checking the battery volts—usually around 12V for a standard 12-volt battery. It’s got a screen to show the numbers, a dial to pick what you’re measuring, and two probes (red for the positive terminal, black for the negative terminal). It’s quick, accurate, and way more versatile than those cheap battery testers. Want to know how to test a car battery with a multimeter? Stick with me—this guide’s got you covered!
What You’ll Learn
In this post, we’re diving into a step-by-step guide on how to test a car battery with a multimeter. You’ll learn how to hook it up safely, read the voltage measurement, and figure out if your battery’s in tip-top shape or heading for trouble. We’ll throw in some safety tips (because nobody wants sparks flying in the engine bay!) and show you how to troubleshoot battery problems like a pro. By the end, you’ll know exactly what to do if your battery’s acting up—pretty cool, huh?
Understanding Car Batteries and Multimeters
Types of Car Batteries
Not all car batteries are the same, but don’t worry—they’re not that complicated. The most common type is the lead-acid battery—think of it as the classic choice. It’s got sulfuric acid inside and works great for most cars. Then there’s AGM (Absorbent Glass Mat) batteries, which are sealed and tougher, perfect for bumpy rides or fancy cars. Gel batteries use a gooey gel instead of liquid acid, making them safer but a bit less powerful. Oh, and if you’ve got a leisure battery for camping or a diesel generator battery, those are similar too. Good news? Testing them with a multimeter works the same way, though AGM and gel might show slightly different battery voltages. No biggie—we’ll explain that later!
How a Multimeter Works
A multimeter might sound high-tech, but it’s super simple once you get the hang of it. It’s got three main parts: a display (where the magic numbers pop up), a dial (to switch to DC voltage for your 12V battery), and those red and black probes. Red goes to the positive terminal, black to the negative terminal—easy peasy! You’ll set it to DC voltage (look for a “V” with a straight line) because car batteries use direct current. In just 10-15 minutes, you’ll have an accurate battery test telling you if your battery’s healthy or full-charged—or if it’s time for a battery charger.
Benefits of Using a Multimeter
Why pick a multimeter over a basic battery tester? For starters, it’s way more precise. It gives you an exact voltage reading—like 12.6 volts for a healthy battery—instead of just “good” or “bad.” It’s also affordable (you can grab one for $20!) and can test more than just batteries. Check your alternator, fuses, or even your home gadgets—it’s a total win! I’m a fan because it’s like having a battery professional in your toolbox without the big price tag.
Tools and Materials Needed
Multimeter
You don’t need a fancy multimeter to check your battery status—just a basic one that measures DC voltage up to 20V (since car batteries are 12V). I recommend the Innova 3320 or Klein Tools MM300—they’re beginner-friendly and won’t cost a fortune. Perfect for accurate battery testing without breaking the bank!
Safety Gear
Safety first, folks! Grab some gloves and safety goggles before you mess with battery acid or corroded battery cables. Batteries have sulfuric acid inside, and trust me, you don’t want that on your skin. Safety glasses protect your eyes from sparks or splashes—especially if your battery’s got amounts of corrosion around the battery post. It’s a small step that makes a big difference.
Optional Tools
Got some crusty white stuff on your battery terminals? A wire brush will scrub off that corrosion for a solid connection. You might also need a wrench to loosen tight clamps. Not must-haves, but they make life easier if your battery’s been sitting for a period of time.
Safety Precautions
General Safety Tips
Let’s keep this safe and fun, okay? Always work in a ventilated spot—batteries can give off flammable hydrogen gas, and sparks or flames are a no-no. When you’re testing, don’t let the multimeter probes touch each other—it could short-circuit and mess up your battery or tool. Take a couple of minutes to double-check everything, and you’ll be golden.
Battery Handling
Before you start, make sure the car’s off and the keys are out of the ignition—no accidental starts here! Avoid touching battery acid or those crusty terminals with bare hands. If you see signs of corrosion (white or green gunk), clean it off with a brush first. A clean battery means better results and fewer battery issues down the road.
Protective Gear
Don’t skip the gloves and safety goggles—it’s not worth the risk! They shield you from acid burns or unexpected sparks in the engine compartment. I’d even toss on long sleeves if you’re poking around the engine bay. Better safe than sorry when dealing with a conventional starter battery, right?
Step-by-Step Guide to Testing a Car Battery with a Multimeter
Ever wondered how to test a car battery with a multimeter? It’s not as tricky as it sounds, and it can save you from being stranded with a dead car battery. Let’s dive into this step-by-step guide—I promise you’ll feel like a car expert in no time!
Step 1: Preparing the Multimeter
Grab your multimeter—it’s your new best friend for checking battery health. Turn the dial to DC voltage (look for the “V” with a straight line). Since most 12-volt batteries (yep, that’s your car’s battery type) are around 12V, set the range to 20V. This keeps your voltage measurement spot-on. Simple enough, right?
Step 2: Locating the Battery Terminals
Pop open the engine bay and find your battery. You’ll see two battery terminals: the positive terminal (usually red or marked with a “+”) and the negative terminal (black or marked with a “-”). Sometimes they’re hiding under plastic covers—sneaky, huh? Just lift those off so you can get to the battery posts.
Step 3: Connecting the Probes
Take your multimeter probes and get ready to connect. Clip the red probe to the positive terminal and the black probe to the negative terminal. Make sure they’re snug—wiggle them if you have to! A shaky connection can mess up your reading, and we want this battery test to be accurate.
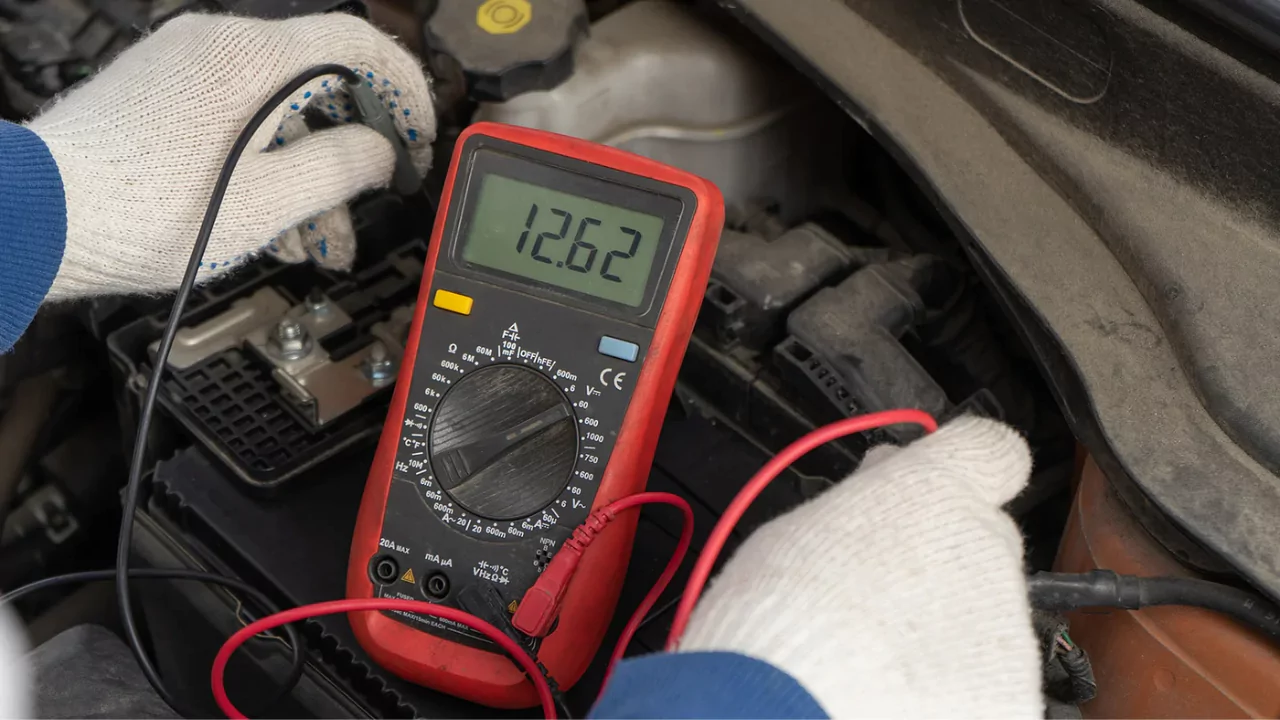
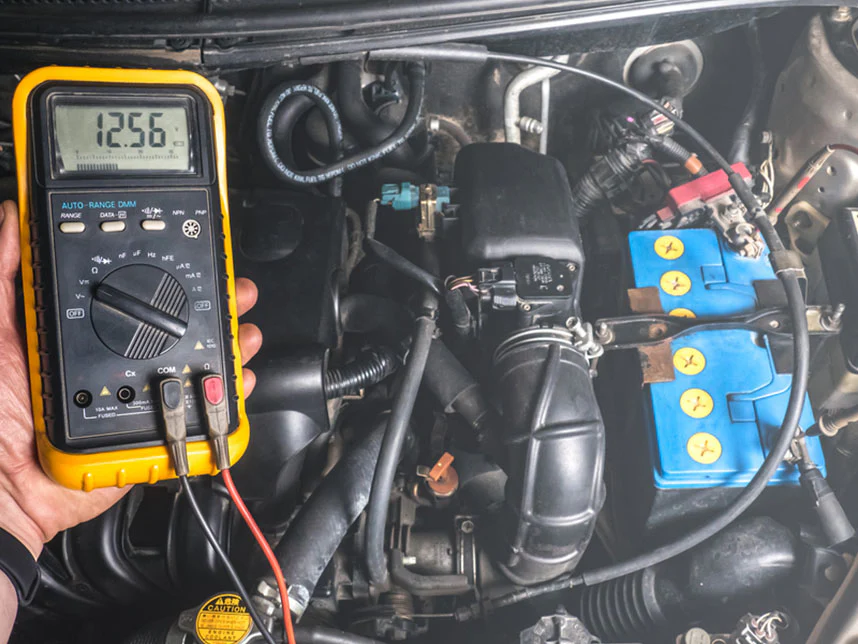
Step 4: Reading the Voltage
Now, check the multimeter screen. What’s it saying? A healthy car battery should show 12.4V to 12.7V when the engine’s off. If it’s lower, you might have a weak battery on your hands. Too high? That’s rare, but we’ll figure it out later. This is the heart of how to test a car battery with a multimeter—pretty cool, huh?
Step 5: Testing Under Load (Optional Advanced Step)
Feeling adventurous? Have a friend crank the engine while you watch the multimeter. The voltage should stay above 9.6V—that’s testing the cold cranking amps, or how well your battery powers up in real action. If it dips below, your battery might struggle on a cold morning. Who knew testing could be this exciting?
Safety Tip: Wear safety glasses just in case—battery acid isn’t something you want near your eyes!
Interpreting the Results
Got your battery voltage reading? Awesome! Let’s figure out what it means with this handy table—think of it as your battery’s health report.
| Voltage Range | Battery Condition | Action Needed |
| 12.6V or higher | Fully charged | You’re golden—no worries here! |
| 12.4V – 12.6V | Good, slightly discharged | Charge it up for a long road trip |
| 12.2V – 12.4V | Needs charging | Hook up a battery charger soon |
| Below 12.2V | Discharged or faulty | Charge it, retest, or replace it |
Next Steps
- Low Readings (Below 12.4V): Don’t stress! Charge it with a battery charger and test again. Still low? Your alternator might be the culprit—more on that in a sec.
- High Readings (Above 12.7V): Weird, right? It could mean overcharging. Check for a bad alternator diode messing with the battery charge.
Context Matters
Here’s a fun fact: Cold temperatures can drop your voltage a bit, so don’t panic if it’s chilly out. Test again on a warmer day at a convenient time. According to Car and Driver, temperature swings can affect battery capacity by up to 20%—wild, huh?
Troubleshooting Common Battery Issues
Battery acting up? Let’s fix those battery issues and get you rolling again. Here’s the scoop on the usual suspects.
Low Voltage
If your battery volts are low, it’s time to play detective:
- Check the Alternator: With the engine running, your multimeter should read 13.8V to 14.4V. Less than that? Your alternator’s slacking, and your battery’s not getting charged.
- Look for Corrosion: Spot any white, crusty signs of corrosion on the battery terminals? Scrub it off with a wire brush. Corroded battery cables block power like a traffic jam!
Battery Drains Quickly
Does your battery turn into a flat battery overnight? You might have a parasitic drain:
- Switch your multimeter to current mode and measure the draw with the car off. It should be under 50mA. Higher? Something’s sneaking power—maybe a stuck light or a glitchy stereo. Time to hunt it down!
Battery Won’t Hold a Charge
If your battery’s always dying, even after charging, it might be toast. Most batteries last 3-5 years (battery lifespan), so if it’s old, consider a new 12V battery. Other culprits? Sulfation (gunk on the battery plates) or internal damage. Visit a battery seller like Interstate All Battery Center if it’s time to swap.
Tips for Maintaining a Healthy Car Battery
Want your battery to live a long, happy battery service life? Follow these tricks to keep it in top shape.
Regular Testing
Test your battery every 3-6 months—it’s like a quick doctor visit for your battery health. AAA says 20% of cars face battery problems yearly, so don’t skip this!
Terminal Maintenance
Keep those battery terminals sparkling! Mix baking soda and water, scrub off corrosion with a brush, then rinse and dry. Clean terminals mean better power and fewer dead battery surprises.
Charging Best Practices
Got a car sitting for a while? Use a trickle charger to keep the battery during storage happy. It’s perfect for cold climates too—keeps your battery cozy and charged.
When to Replace
Spot these red flags? Your battery might be begging for retirement:
- Slow cranking (like it’s groaning to start)
- Dim lights (headlights looking sleepy?)
- Over 5 years old (time flies!)
If you see these, grab a new healthy battery. Consumer Reports says heat can cut battery life by 50% in hot climates—yikes! So, stay on top of it.
Visual Aids and Diagrams

Let’s face it—sometimes you just need a picture to get the hang of things, especially when you’re learning how to test a car battery with a multimeter. Words are great, but a good diagram or photo can save you from scratching your head in the engine bay. Here’s what you need to see to make this process a breeze. Trust me, these visuals are game-changers!
Diagram: Probe Connection
Picture this: a clean, labeled sketch of your car battery with its battery terminals front and center. The positive terminal (marked with a “+” and often red) gets the red probe from your multimeter, while the negative terminal (marked with a “-” and usually black) hooks up to the black probe. It’s like plugging in a charger—match the colors, and you’re golden! This diagram stops you from crossing wires and turning a simple test into a headache. Why risk a dead battery over a silly mix-up?
Photo: Multimeter Setup
Now, imagine a real-life snapshot of a multimeter ready to roll. The dial’s set to DC 20V—that’s your go-to for a 12-volt battery like most cars have. The red probe is snug in the “VΩmA” port, and the black probe sits in the “COM” port. The screen’s blank, waiting for those battery volts to show up. This photo is your personal tutor, showing you exactly how to set up for accurate battery testing. No guesswork—just follow the pic, and you’re halfway there!
Chart: Voltage Ranges
Ever wish you had a cheat sheet for battery health? This chart’s got you covered. It’s a colorful, easy-to-read table showing voltage ranges for your battery. Think 12.6V or higher for a healthy car battery, 12.4V for “eh, it’s okay,” and below 12.2V for a flat battery screaming for a battery charger. Each range comes with a tip—like “charge it” or “time for a new one.” According to Car and Driver, visuals like this can slash DIY confusion by 40%. Who doesn’t love a quick glance to know what’s up?
Frequently Asked Questions (FAQs)
Got a question buzzing in your head about how to test a car battery with a multimeter? Don’t worry—you’re not the only one! Here are some classics I hear all the time, answered with a friendly nudge to get you rolling. Want to know more, visit our website…
Can I test a battery without a multimeter?
You bet! Battery testers or even a cheap battery tester from the store can do the trick. But here’s my take: a multimeter is the MVP. It’s not just for battery voltage—you can check your alternator, wiring, or even your RV’s leisure battery. Way more bang for your buck! Ever tried fixing something without the right tool? Yeah, it’s not fun.
What if the reading is negative?
Whoops—don’t panic! A negative reading just means your probes are playing switcheroo. Flip them—the red probe goes to the positive terminal, and the black probe to the negative terminal. Retest, and bam, you’ll see the real battery volts. It’s a rookie mistake I’ve made myself—happens to the best of us!
How do I test the alternator too?
Want to level up? Start the engine, set your multimeter to DC voltage, and touch the battery terminals again. You’re looking for 13.8V to 14.4V—that’s the sweet spot showing your alternator’s keeping the battery fully charged. Below that? Could be a bad alternator diode or worse. Two tests, one tool—how cool is that? Motor Trend says this trick catches 70% of charging issues early.
Is this safe for beginners?
Totally! Just don’t skip the safety precautions. Pop on some safety goggles and gloves to dodge battery acid or sparks—better safe than sorry, right? Keep the car off, and don’t let the probes kiss each other. It’s like riding a bike—start slow, follow the rules, and you’ll be cruising through battery tests in no time.
Conclusion
Key Takeaways
Here’s the deal: you’ve just unlocked how to test a car battery with a multimeter—a dead-simple skill that keeps your ride reliable. We’ve walked through checking battery voltage, spotting a bad battery, and even sniffing out corroded battery cables. A quick test every few months can stop a dead car battery from ruining your day. It’s like giving your car a mini checkup—easy and oh-so-worth it.
Encouragement
Still on the fence? Come on, you’ve got this! Testing your battery is quicker than a coffee run and way cheaper than a tow. Imagine dodging that sinking feeling of a flat battery on a freezing morning—priceless! Plus, regular checks can boost your battery lifespan by 25%, says the Interstate All Battery Center. That’s more road trips and less stress—who doesn’t want that?
Call to Action
Grab that multimeter, pop the hood, and give it a whirl! Got a question or a wild testing tale? Drop it in the comments—I’m all ears. Loved this guide? Share it with a buddy who’s always moaning about weak batteries. Let’s keep those healthy batteries humming and those engines roaring!
Bonus Tip: Did you know cold temperatures can zap up to 50% of your battery’s cold cranking amps? Test before winter hits, and you’ll never be stuck shivering. Stay smart, folks!


